Pages

Monday, October 31, 2011

D27 D27 WHAT?!

This past weekend (10.29.11) was Fall Rally North for the Key Clubbers from CaliNevHa.  It was at Six Flags Discovery Kingdom, and it was LOADS OF FUN!
What exactly IS Key Club?  Well, it's really hard to explain, so I'll let the Key Club site tell you!  
Anyways, this weekend a whole bunch of us northern Key Clubbers went to Six Flags and attended a rally where we competed for the highly-coveted spirit stick.  We showcased our cheers and cheered all over Six Flags.  THE. WHOLE. DAY.  My voice was literally gone for two days.  Crazy.  Well last year, the District 27 Grizzlies (that's us!) won it, and we were the one to beat.  Our biggest rivals were the D7 south monsters.  This year, we didn't win it, it was a close call!  Those dumb Monsters won it.  We all said it was cos we won last year, I think so too.  Next year, we're bound to win.  
NOW, that story is over, finally, so here comes the nail spam.


Both Hands! With our signature cheer, and part of another Grizzly cheer.

Thumb-Key
Index-F (for fall)
Middle-R (for rally)
Ring-N (for north)
Pinky- Club

I sponged red on the thumb and pinky so there was just a white strip.
The rest were nude/beige with a red block and a silver stripe.


My right hand
!
Thumb- Roar
Index- 7 (27)
Middle- 2
Ring- D (for district)
Pinky- red craft glitters on white base

My left hand
!
Polishes I used, in order from L to R:
Jordana- Calcium Boost basecoat
unnamed beige/nude
NYC- Big Apple Red Creme
AVON- french tip white
Sally Hansen- Red Carpet
Le Belle- Pure Black
Jordana- Crystal Glitter
KISS- silver glitter striper
AVON- clear
Out The Door
some unnamed clear
Brown acrylic paint

I kind of cheated with these too. ;D  Don't tell anyone!  I just painted them on a ziploc baggie, put some clear/topcoat, and peeled them off to make my own easy to use nail decals.  I'm sure there are tutorials, or I can make one if needed. (:

And a bonus!  My tutu I made JUST for FRN(:
It was cute with the Key Club shirt I made into a tanktop.

And if you couldn't tell, RED was D27's colour(;

That's all for now!  Sorry for the MEGALONG story! D:  I felt the need to inform the general people, though(:  <3


Thursday, October 27, 2011

Nailed to the T!

So, the lovely blogger over at Nailed to the T is having a 200 follower giveaway!  You guys should go follow her, because her nails are SOOOO pretty!  CLICK HERE!

Look out for my SPIRIT NAILS!  and my "The Night The Sun Came Up" nails(:

I love you all<3

Thursday, October 20, 2011

IT'S HALLOWEEN!

Actually, it's not.  YET.
I enjoy Halloween.  I mean, what kid doesn't?  I'm only a freshman after all, so I can still be a kid!
I love the candy.  And decorations.  And the costumes.
But mostly, THE NAILS!
My right hand!
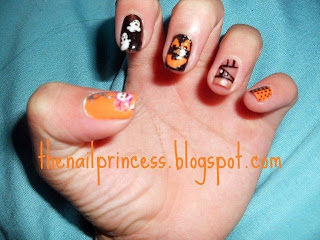
I've got an orange and black gradient on my thumb, with glitter!
Orange and black splatter on my index.
Orange and black stripes on a white base.
Bloody red blood drips.
Candy corn pinky!
My left hand!
I've got a silver spiderweb with a cute spider,
Ghosts,
A glittery jack-o-lantern,
A mummy,
Orange and black dots on opposite base colours!

A better look...

The paint and polishes I used...
Orange acrylic paint, AVON clear, an unnamed yellow from Icing, La Belle black, Avon's French Tip White, an unnamed beige/nude colour, NYC Big Apple Red, Claire's silver glitter polish in a black jelly-like base, gliiter polish from Jordana, KISS silver glitter and black stripers, NYC extra shiny top coat, Out the door fast dry top coat.

I actually don't have the names and specific parts of these polishes since I'm in Vegas, so when I come home, I think I can detail it more.  However, it's not needed, since any brands can be used.  It's just that these are the polishes I used.


Have a SPOOKY Halloween everyone(:


Saturday, October 15, 2011

DISASTER.

Disaster has struck.
It happened on Friday.
I flipped out.
That's right,
I BROKE MY NAIL.

Hah, okay, not so disastrous.  But still, it was pretty bad.  Now my right pinky nail is a nub.  It's painfully nubby.  Kind of like a little 3-year-old's nails.  Kind of.  Darn practice! *shakes fist*

I still have a nail design saved(:  So, never fear!  Pics!


These were my left hand.
I just swirled them, using the same technique I will describe below, then I used a white striper to paint some lines and fill them in.  I then used some corresponding nail gems.  I didn't really like this look all too much, but it was easy, so oh well!


These were on my left hand.

This look is REALLY easy to do.  All you have to do is paint your nail a base colour and let it dry.  Then, you take that same colour and another colour (I chose white) and sort of blob them on your nail.  While they're still wet, just swirl them together until you like the way it looks.  
OR you can do what I did on my pinky, which is hard to see.  Paint a white base, then paint half the nail with one colour, and the other side with another, and swirl/drag them across each other.

Look out for my Halloween themed nails (FINALLY!)

Tuesday, October 11, 2011

A Little Rearranging

So, I think posting EVERYDAY was ultimately a super bad idea.  Like, bad.  Thinking about a new post is consuming my brain.  I mean, even last night, I was up thinking about WHY I didn't post.  Then I realized my pictures were saved onto ONE of my computers, and conveniently, I was using a different one. With NO blog-worthy pictures.  At all.  
This leads me into believing I can post every other day.  I have no idea how this'll work once I go back to school, but I think I can make it work.  Otherwise, I'll have another idea. Like every 2 days. Or week.  You know, something that won't fail me or my brain.
ANYWAYS, I digress.  So, today's nails are actually from my first day of high school.  
Animal french tips! 

I did these on one hand, while the other had the full nail in animal print.  I got tons of complements on them, and I had tons of upperclassmen asking where I had gotten them done.  Boy, were they shocked to find out a little freshman did them herself. ;D

So, in order from thumb to pinky:
Leopard/cheetah
Zebra
Giraffe
Tiger
Cow
I put these in a way so that the stripes were between each "spotted" animal, just to give it a subtle pattern, and so that they weren't all clumped together.  Zebras and White Tigers are pretty close, I mean, just look at their patterns!

from Google Images


OKAY, maybe not.  But, close enough, right? :D
I count these as a french tip mani, because although the design goes about halfway, the actual base colour is in a french tip, and is seen peeking through.  The other hand (no pictures, *GASP*) is a full design, like how most people would do them.  The order on the other hand from thumb to pinky was just the reverse of this one.  

That's all for now(:  Look for my posts about every other day! 


Sunday, October 9, 2011

Somewhere Out in the Galaxy

Galaxy Nails!  I love the way these look, and I ADORE how easy these are to do.  They look like a lot of work, but they're not.  I'll show you, and tell you, how it's done.
Just paint on some black.  Sponge on some white in a curved line.

Sponge on some yellow on parts of the white, but not so much that you cover it up.

On top of the yellow and pink, lightly sponge on some pink, but again, not so much that you cover up either colour.

Around the edges of the white, sponge on some navy blue to fade it out.  With a toothpick, needle, small dotting tool, or anything with a small edge, dot on tiny dots for stars.  Dot on a few bigger dots for the bigger stars.  Go over it with a glittery top coat, preferably gold or silver.  Apply a coat of regular top coat, and you're done!
These are the polishes I used.

Clear--Avon
Black--La Belle "Pure Black"
White--Avon "French Tip White"
Yellow--Icing
Pink--New York Color "Greenwich Village"
Navy Blue--Revlon "Midnight Affair"
Glitter--Colortrend color me pretty topcoat "Gold Spritzer"
Topcoat--OutTheDoor dry fast

That's all for now(:  And if you've noticed, I FINALLY got all the polishes I used for this one. ;D


Saturday, October 8, 2011

A Little Black....French?


Because I'm a busy girl, and I (unrealistically) am trying to post something everyday, I decided on a simple, yet priceless black french tip.  Of course, I don't like plain nails, but am far too busy to REALLY spice it up.  So, nail stickers for me! :D


I freehanded these, seeing as they're pretty uneven.  
I used Milani's black nail art striper (cute bottle!).  I also used some nude polish I got from a friend, no name or label D:

Only one picture! How sad, but it's a simple manicure, so I don't see why not.
That's all for now! 

Friday, October 7, 2011

I Spotted a Half-Moon!

  Another hot new thing is half-moons!  You know them, they're like reversed french-tips.  They're really simple to do!  All you need is nail polish and those binder hole reinforcement stickers!
  I think a chic twist on them is adding polka dots, which I did.

They're pretty easy, and they look cute too! ^-^

Just put one of those stickers (I cute them in half, so I use less) down on the last part of your nail, wherever you want the half moon to be, then use your nail polish over it.

I added black polka dots with a dotting tool, but any dotting "device" will work.
I also outlined the half moon with my silver striper.
Two coats of any good topcoat and you're done!

If you're really good, you can always freehand the half-moons, but I chose to use the reinforcement stickers, simply because they produce nice, round, shapes.
 That's all for today(:

Thursday, October 6, 2011

Cheetah Nails, anyone?

Cheetah nails are BIG now!  You can't blame it, though, they're pretty cute!  Especially when you spice them up with different colours, AND freehand it(:  All this makes for one happy girl!

Right hand!  Red, Blue, and Yellow cheetah spots on white. I can't help but notice the way my bedsheets are rocking the multicoloured dots on white too. (:


Left hand!  Dark blue cheetah spots on light blue.  This was before clean-up, so excuse the messiness. 

Unfortunately, I can't remember all the polishes I used for the life of me. d:  Oh well, maybe when I re-organize my collection, I can figure it out. 

First Post!

So, yay! for nail blogging.  I guess I started this because I'm always drooling over other nail blogs. x]  Haha, well here's to showing off my nails, and tutorials and whatnot.  I'll try to post everyday.  This is just Day 1, in a this long journey of mine. WOO!